Developer Guide
Table of Content
- 1. Introduction
- 2. Setting up
- 3. Design
- 4. Implementation
- 5. Documentation, Logging, Testing and DevOps
- Appendix A: Product Scope
- Appendix B: User Stories
- Appendix C: Non Functional Requirements
- Appendix D: Instructions for Manual Testing
1. Introduction
Welcome to TermiNUS!
TermiNUS is a CLI (command line interface) program for NUS students who wish to consolidate their NUS academic needs such as schedules, questions and notes for the modules that they are taking. With TermiNUS, it aims to aid students and improve their learning experiences while studying in NUS.
TermiNUS is written in Java 11 and uses the Object-Oriented Programming (OOP) paradigm which provides us with means to structure a software program into organized and reusable pieces of codes, making it more efficient for future improvements and revisions.
1.1 Purpose
This developer guide is for any developers who wish to contribute to TermiNUS. It contains the
overall architecture design of TermiNUS and it displays our main features implementation details
with the rationale and consideration for each. As of now, the guide is written for the current
release version of TermiNUS of v2.1.
1.2 Acknowledgements
We would like to thank the following projects and repositories for assisting in the development of TermiNUS.
- GSON: Providing the JSON parsing capabilities for the main file.
- OpenPDF: Providing PDF exporting capabilities for notes.
- AddressBook-3: Providing a guide on writing the guides you are reading now.
1.3 Using this Guide
Along the way you might encounter several icons. These icons will provide you with different types of information that you may find useful.
💡 Take note when you see this icon, as it might tell you something important.
📝 Note: This icon represents additional information that might be useful when using our application.
For UML Sequence Diagram, do take note that there is a limitation in puml hence the lifeline will still continue even after the X has already taken place.
Lastly, text that is blue like this example, are clickable links that will bring you to the relevant part of this developer guide.
2. Setting up
2.1 Setting up the project in your computer
2.1.1 Prerequisite
Before setting up the project, please do ensure you have the following items installed.
Java Development Kit ver 11 (JDK 11) is the environment / programming language in which
TermiNUS is written with and IntelliJ IDEA will be the integrated development environment (
IDE) platform for us to write the programming codes on.
2.1.2 Getting the project files
Go to link and retrieve the TermiNUS project file.
You can do so by forking the project and cloning a copy into your computer.
To learn more about github fork-clone feature please follow the guide on link.
2.1.3 Setting up on IntelliJ IDEA
- Open the application
IntelliJ IDEA. - Inside
IntelliJ IDEAnavigate toopen projectbutton- On the top left of the app,
File→Open...
- On the top left of the app,
- Locate and select the folder containing the files for Terminus that you have downloaded earlier on.
- Change the Project SDK that IntelliJ IDEA will be using.
- On the top left of the app,
File→Project Structure... - Under Project SDK: section, find and select JDK version 11.
Eg:
Amazon Corretto version 11.0.12. - Under Project language level:, select
SDK default.
- On the top left of the app,
- Verifying the setup
- After performing the steps above, locate the file
src/main/java/terminus/Terminus.java, right-click and selectRun 'Terminus.main()'. - If everything is correctly set up, you should see the following terminal.
Welcome to TermiNUS! You have no schedule for today. Type any of the following to get started: > exit > help > module > go > timetable [] >>> - After performing the steps above, locate the file
2.1.4 Configuring the Coding Style
Import the coding style xml file into your IntelliJ IDEA.
You can download the xml file here.
- Go to IntelliJ IDEA settings page.
- Located at the top-right of the app, click on the gear icon and select
Settings....
- Located at the top-right of the app, click on the gear icon and select
- Under the settings page, locate the
Code Styletab.Editor→Code Style
- Once you are at the
Code Styletab, you will need to import thexmlfile.- At the
Schemesection, select the gear icon and selectImport Scheme→IntelliJ IDEA code style XML. - Locate and select the
xmlfile that you have downloaded earlier. - Once done, select
ApplythenOK.
- At the
- Now your IntelliJ IDEA should follow our Coding Style.
💡 IntelliJ IDEA have certain shortcut key to aid in auto-formatting of code. Once you are done with a piece of code, highlight the section you have just written and press the key
CTRL + SHIFT + L.
3. Design
3.1 Architecture
This section will provide insight to the general overview of TermiNUS’s architecture.
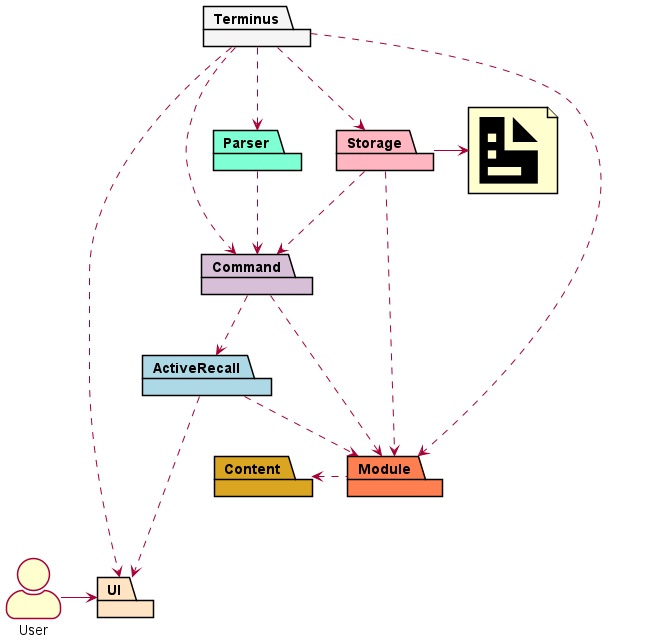
💡 The dotted arrow represent a dependency between different components. The solid arrow represents an interaction between the component and the external system or user.
The Architecture Diagram above describes the high-level design of TermiNUS and how the different components interact with each other. Below we will provide a quick overview of each component involved.
The Terminus class is the main entry point of the application and contains the main method used
by Java as the starting function.
The Terminus class main responsibilities include:
- Initializing various components required for the program to run.
- Requesting the specific modules to load data from file into the program.
- Performing any data entry saving and clean up when the program is going to terminate.
The rest of TermiNUS consists of 7 other components:
UI: Manages the input and output of TermiNUS.Parser: Parses the user inputs and their arguments.Command: Execute the required commands and store the output.Module: Manage the multiple different types ofContentContent: Stores and Provides user information.Storage: Reads the data, and writes data back to the hard disk.
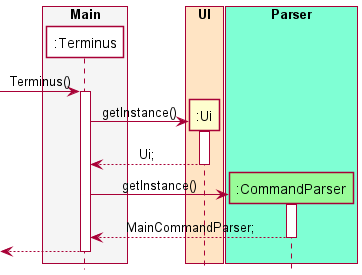
Below contains some example sequence diagram to help illustrate the general program flow and
how the many object interact with one another in TermiNUS.
The first diagram shows the constructor of Terminus class running to initialize essential Modules
such as UI and Parser.
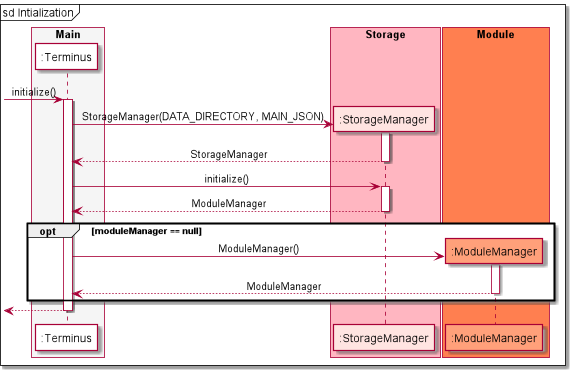
The next sequence diagram shows the loading of user data into Terminus.
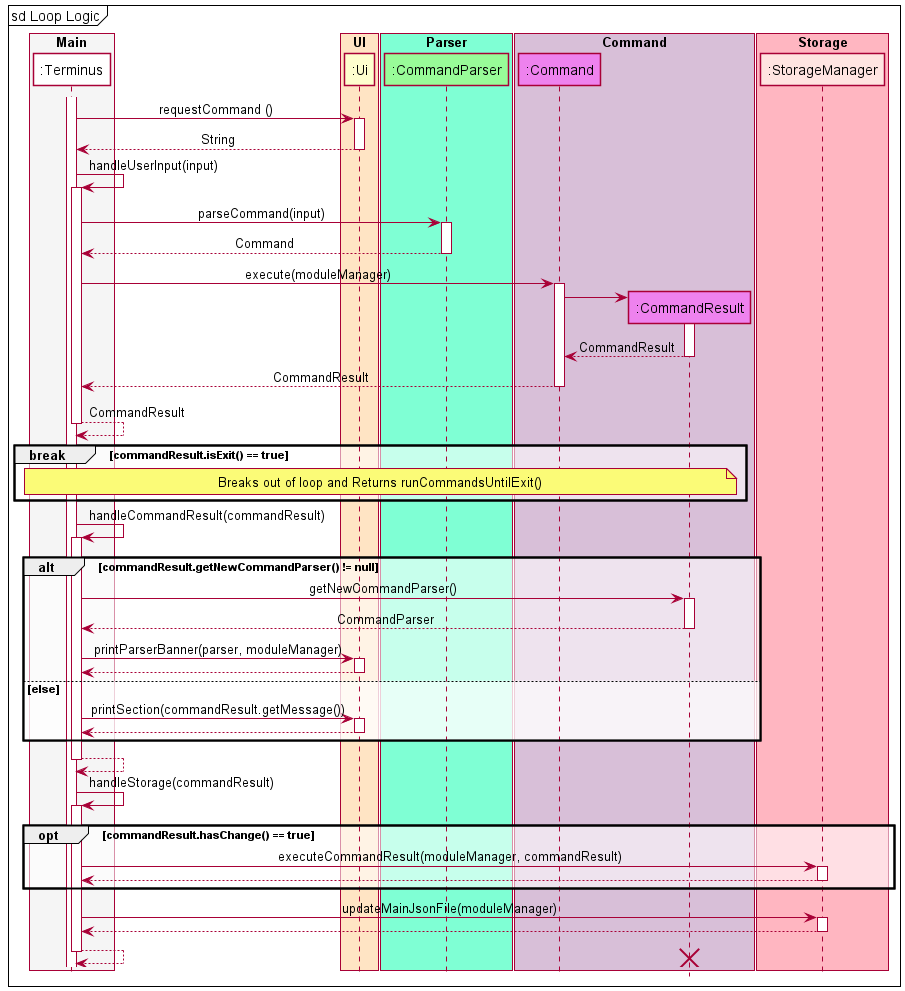
The next sequence diagram shows an instance the main logic loop.
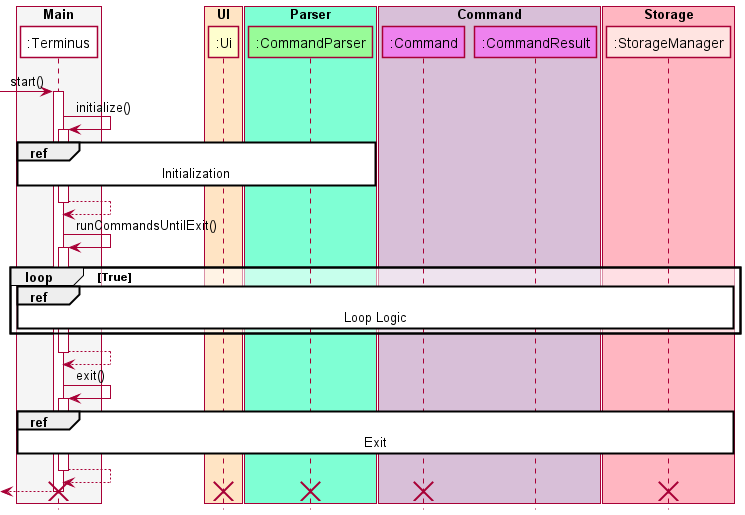
📝 Note: The cross on each lifeline represents the end of objects lifeline. Due to the limitation of PlantUML the line continues to extend.
The next sequence diagram shows an instance of command execution.
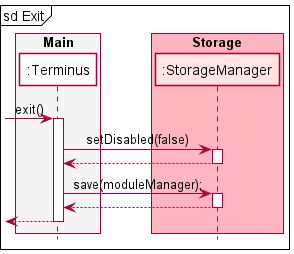
The next sequence diagram show the termination of Terminus
3.2 UI Component
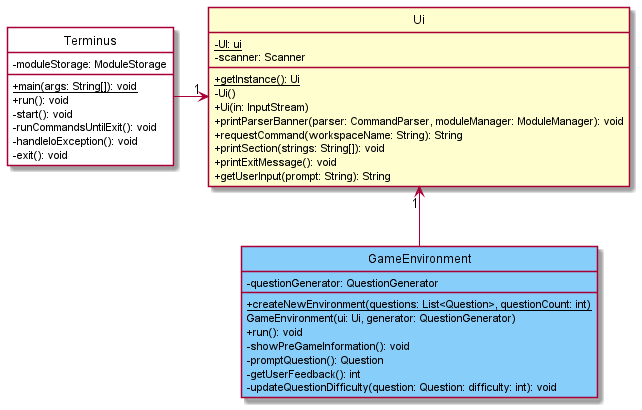
The Ui Component consists of the Ui class which handles all input and output operations within
TermiNUS application. To reduce coupling, we have used Ui on only the main runner Terminus, and
the Active Recall GameEnvironment. If future features require the extended use of Ui, they may
call getInstance() from Ui to get the same singleton class as both GameEnvironment and
Terminus.
The Ui implements the following functionality:
- Printing large custom banners with moving to new workspaces.
- Getting of user input through
getUserInput()andrequestCommand(). - Printing string arrays to the output through
printSection().
3.3 Parser Component

The CommandParser Component consist of the CommandParser and multiple XYZCommandParser,
each representing a specific type command parser. The CommandParser will receive a command in
parseCommand function and check the according HashMap<String, Command> before
returning the according Command object back.
The CommandParser implements the following functionality:
- Parsing the command string and giving the respective
Commandobject. - Keeps track of the workspace.
- Provides functionality to list all commands for the help
Command.
3.4 Command Component
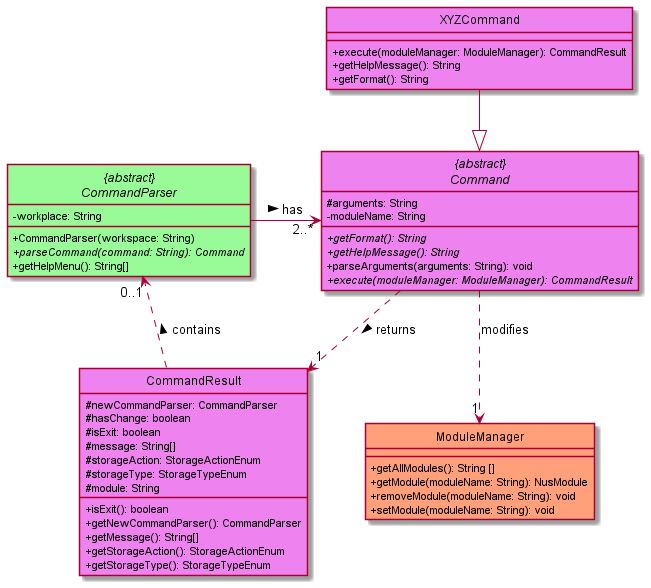
The Command Component Command class, CommandResult class and multiple XYZCommand
each representing a specific type of command. Each Command will parseArguments and set them
to private variables, and then execute would run specific operation specified by XYZCommand.
The Command would then store the required changes needed to be made in the Storage component and the resulting output message in CommandResult.
The CommandResult will contains certain attributes that will indicate certain operations:
- Contains a
messageto be printed as the output for theCommand. - Contains the
newCommandParserrequired to switch workspaces. - Indicate the if file operations are required and the corresponding actions.
- Tracks if the program should terminate.
3.5 Module Component
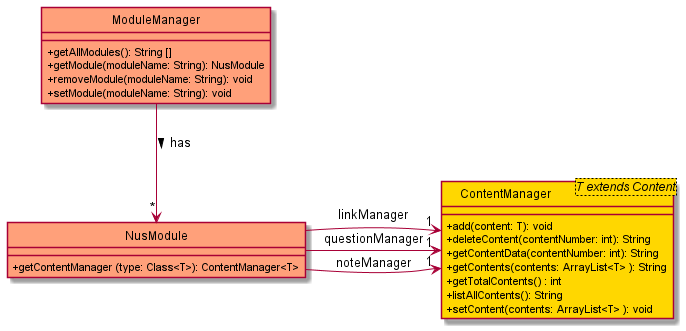
The Module Components consists of the ModuleManager which contains a collection of NusModule and
maps a module name to a specific NusModule.
The NusModule consist of ContentManager which help to manage Content.
The ContentManager accepts a Content type generic which is from the Content Component
The ModuleManager implements the below functionality:
- Add, delete or retrieve a specific
NusModule. - List all module names.
- Grants access to the different types of content stored by
NusModule.
3.6 Content Component
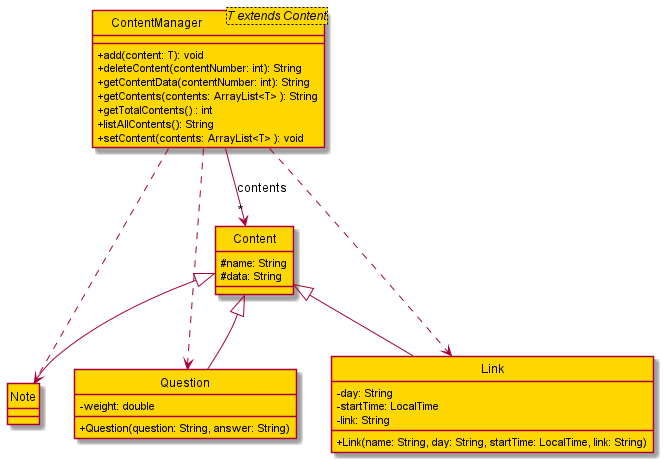
The Content Component consist of objects such as Link, Question and Note
which inherit from the abstract Content class. The ContentManager allows a generic
<T extends Content> which must belong to the Content type or its children. The
ContentManager manages an ArrayList of Content type and provide the following functionality:
- Adding of any Content type.
- Removing any Content.
- Accessing the Content and the inner data attribute.
- Getting the total number of content.
- Listing all contents.
- Accessing the arraylist of contents.
3.7 Active Recall Component

The Active Recall Component consists of the GameEnvironment as the centre of the design.
The GameEnvironment consists of a QuestionGenerator which will only exist if there is a
GameEnvironment, and a Ui instance to handle user input and printing of information. The
decision to re-use the Ui is to allow easier upgrades to the Ui if there is a need in the
future.
The QuestionGenerator takes in a list of Question and a maximum question count to randomly
generate questions based on Random. If Random is not provided, a new Random with a random seed
will be created to generate the Question order.
The DifficultyModifier is a utility class used to calculate and tweak the weights of Question
after the user has provided feedback on the difficulty of the question. It uses a
logistic curve to calculate the change in weight.
For further details on the implementation, head to 4.2 Active Recall Implementation.
3.8 Storage Component
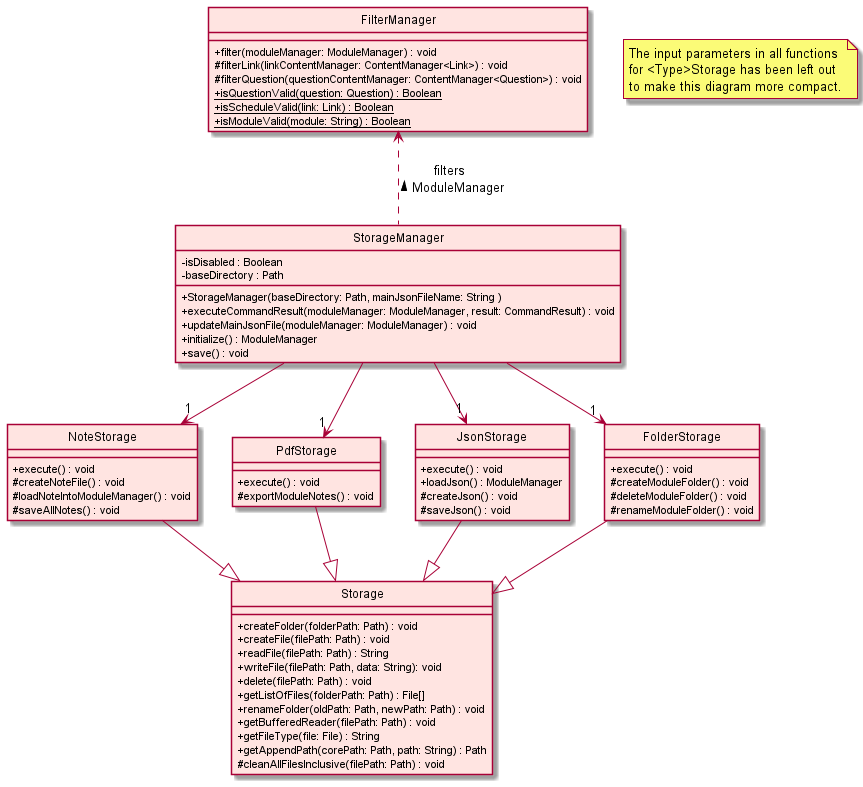
The StorageManager handles any file I/O operations of TermiNUS.
The StorageManager component:
- can create folder for each module provided by the user.
- can save / load modules, schedules and links data in / from a
.jsonfile. - can save / load notes into / from multiple
.txtfiles. - can filters invalid data loaded from a
.jsonfile.
TermiNUS saved these data as either a .json or .txt file so users will be able to edit saved
data easily with any available text editor.
4. Implementation
This section introduces the specific implementation details and design consideration of some features in TermiNUS.
4.1 Timetable Feature
The timetable feature aims to provide users a single command to access all the schedules they store in different modules within TermiNUS. This feature would ease users in accessing a compilation of all their schedule, instead of having to access all the individual module workspaces.
4.1.1 Current Implementation
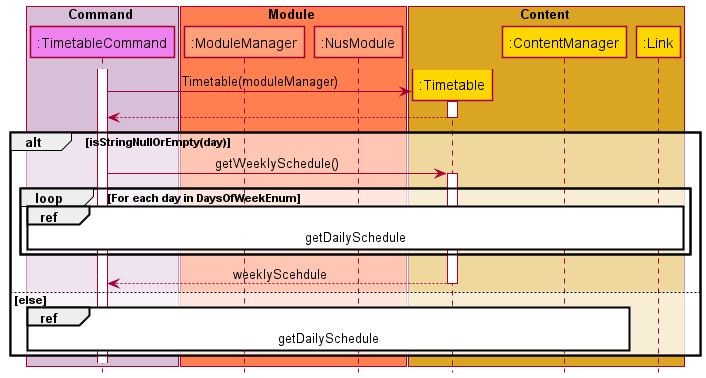
The following sequence diagram shows how the timetable feature works:
The timetable feature is one of TermiNUS’ features which can be accessed from the main workspace.
The timetable feature has 2 variations:
- Daily Timetable
- Weekly timetable.
The timetable feature is facilitated by the TimetableCommand.
By running the command timetable with the relevant parameter, the MainCommandParser will construct a new TimetableCommand.
This TimetableCommand will be used to execute the user’s timetable instruction.
Given below is an example usage scenario showing how the TimetableCommand behaves at each step.
Step 1: User executes the command timetable from the main workspace.
A new TimetableCommand will be generated by the MainCommandParser
Step 2: The application invokes TimetableCommand#execute() to execute the user’s instruction
Step 3: During the execution, TimetableCommand#execute() will generate a new Timetable.
TimetableCommand#parseArguments() will also be invoked to acquire the user arguments, if any.
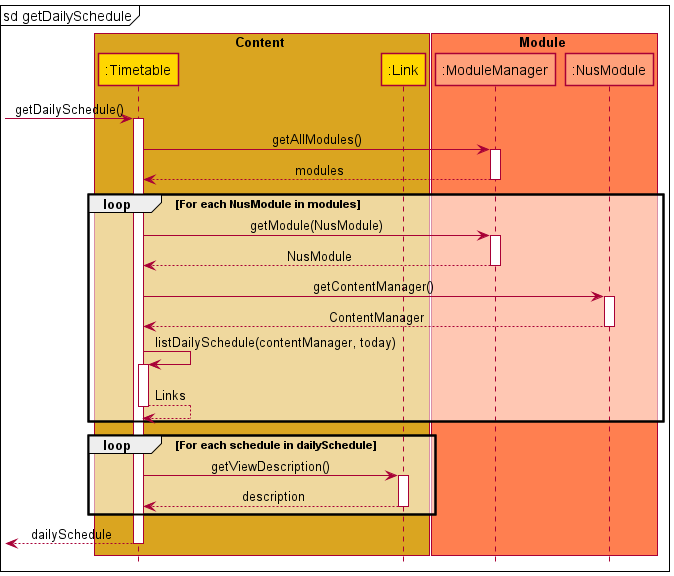
If user argument exists, then TimetableCommand#execute() will invoke Timetable#getDailySchedule(), as it is a Daily Timetable Instruction.
Otherwise, Timetable#getWeeklySchedule() will be invoked instead to facilitate the Weekly TimetableInstruction.
Step 4: Once the relevant Timetable method has been invoked, it will first construct a ModuleManager and invokes ModuleManager#getAllModules() to get all the user’s modules.
The application will iterate through all the user’s modules and invoke ModuleManager#getContentManager() for each of the user’s modules.
Step 5: Once the ContentManager has been acquired, the application will invoke ContentManager#getContents() to acquire all the Link objects stored by the user.
For each Link, the application will invoke Link#getDay() to allow the filtering out of Link objects which has a different day attribute from the user request.
Note: If the instruction type is a Daily Timetable Instruction, then Step 5 will only be executed once for a specific day.
Otherwise, for a Weekly Timetable Instruction, the process in Step 5 will be repeated for each day in the DaysOfWeekEnum.
Once all the relevant Link objects have been collected, the application will sort all the user Link according to its startTime to allow a more convenient viewing.
4.1.2 Design Consideration
This section shows the design considerations that were taken into account when implementing the Timetable feature.
Aspect: Accessibility of Timetable
| Approach | Pros | Cons |
|---|---|---|
| Accessed in the main workspace | Generates a compiled timetable of all user schedules | Requires to gather links from all content managers |
| Accessed under each module | Easier to implement, as links are gathered from one content manager | Functionality might not be as useful for users |
Chosen Solution: Accessed in the main workspace, as we decided that organizing and creating a compiled timetable of all the available user schedules will be better for user experience. Moreover, implementing a timetable for each module might be slightly redundant as a view schedule command could offer a similar functionality albeit not sorted out.
4.2 Active Recall Implementation
This section details the technical implementation of Active Recall.
To view the high-level diagram, head to 3.7 Active Recall Component.
4.2.1 Current Implementation
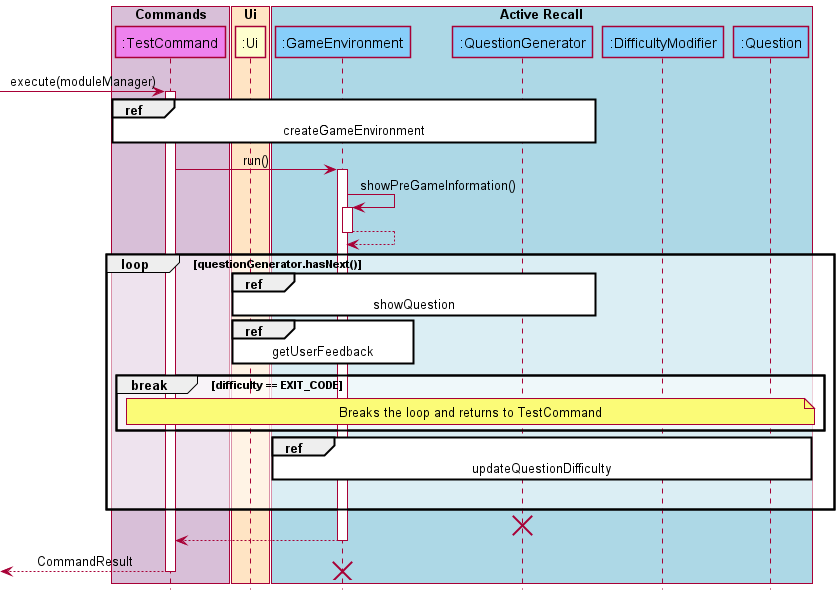
The overall sequence flow is shown above.
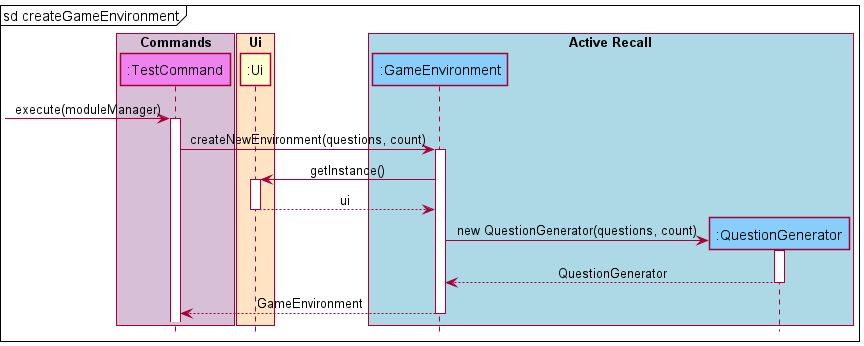
Step 1: When the user executes the TestCommand, the GameEnvironment will be created with the
static method GameEnvironment.createNewEnvironment(), where it will handle the creation of
QuestionGenerator as well.
Step 2: The QuestionGenerator creates a NavigableMap<Double, Question> to store all the
questions, where the Double is the question.getWeight() + total, where total is the current sum
of all the weights currently in the bank. The rationale for the NavigableMap and key value will be
explained at promptQuestion() below.
Step 3: The newly created GameEnvironment will be returned to TestCommand where it would
call the run method within the object.
Step 4: The showPreGameInformation() method will print the information once on the current Active Recall
session, such as the actual question pool size, and may include more information and statistics in
the future.
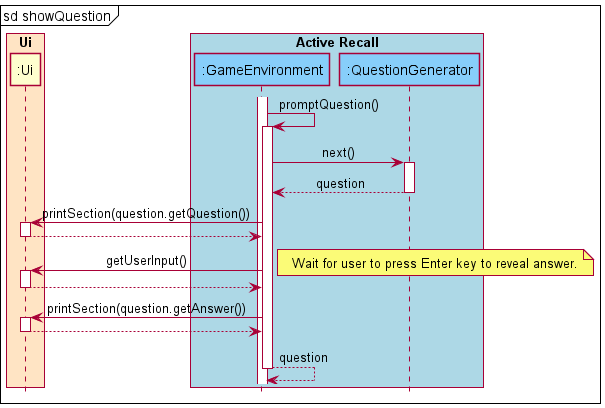
Step 5: Next, the run() method will start a loop and check if there are questions in the local
questionGenerator to ensure that the session can continue. After which, the promptQuestion() is
called, where the next question is pulled from questionGenerator.next() and displayed to the user.
Step 6: Within the next() method in the QuestionGenerator, it will find a random double
number from 0 to total, and look up a Question that is closest to the value. When the
Enter key is pressed by the user, the answer is then displayed and the promptQuestion()
passes the Question object back to the run() method.

Step 7: The program now runs getUserFeedback() to collect user feedback, and return
the difficulty back to run() after cleaning the input. This is also when the user can decide if
they wish to quit the session, and if they do, the difficulty value will be set to EXIT_CODE = -1.
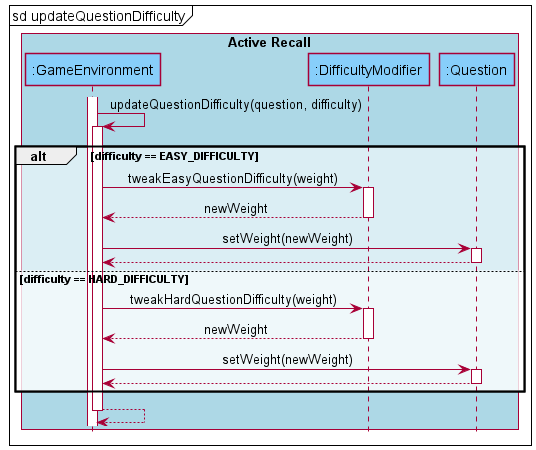
Step 8: If the difficulty is checked to be the EXIT_CODE, the loop will break and return. Otherwise, the
Question’s difficulty will now be changed in the updateQuestionDifficulty(question, difficulty)
method, where we use the difference between the extremes and the current difficulty to apply into
the logistic curve to determine the amount to increase or decrease the weight of the randomness by.
Step 9: Once the adjustment of weights of the question is done, Step 5 to 9 is repeated if
there are questions left inside QuestionGenerator. Otherwise, the Active Recall session will be terminated,
and the input will be passed back to the CommandParser.
4.2.2 Design Consideration
The reason for using NavigableMap to generate questions was because it provides a method called
.higherEntry(key), which guarantees a Question is returned provided the value never exceeds
the total weight of the question pool (which should never happen as the random number generator can
only generate between 0 and total).
Aspect: Hiding the answer from the user
| Approach | Pros | Cons |
|---|---|---|
| Enter Key | Allows user to reveal the answer at their own pace | Requires user input |
| Timer | No user input | Might reveal answers too early or late |
Chosen Solution: Enter Key, as it is the most effective way to ensure the answer does not get revealed unless the user intents to view it.
Aspect: Questions randomness needs to be re-weighed.
| Approach | Pros | Cons |
|---|---|---|
| Change weights by a fixed amount | Simple to implement | Easy questions might never ever appear again. |
| Change weights with logistics curve | Weights don’t increase/decrease out of control | Requires curve calibration |
| Use ELO/Glicko | Questions have fair share | Requires questions to “compete” against each other |
Chosen Solution: Logistic curve, as it ensures once the user finds a hard question easy, it would quickly move down a difficulty and vice versa. We will continue to seek user feedback and tweak the curve parameters if needed.
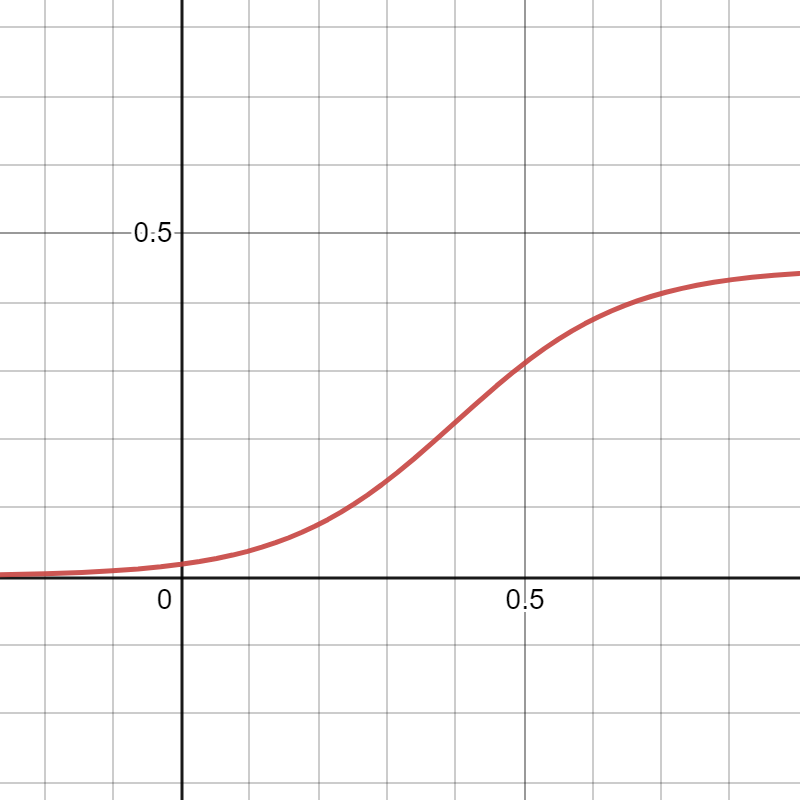 The parameters of the logistic curve can be viewed here:
https://www.desmos.com/calculator/qefovvnuhx.
The parameters of the logistic curve can be viewed here:
https://www.desmos.com/calculator/qefovvnuhx.
4.3 Workspace Implementation
This workspace feature aims to provide users with a better experience in navigating the different features TermiNUS has to offer, and caters for both users which enjoy using a particular feature or prefer typing commands in a single step.
4.3.1 Current Implementation
The workspace feature was implemented with the idea of a single command input as well as a multiple
step input. For example, running 3 separate commands go Module -> note ->
add "Content Name" "Content" would perform the same functionality as a single command
go Module note add "Content Name" "Content". This workspace feature implemented in the Command and
CommandParser component.
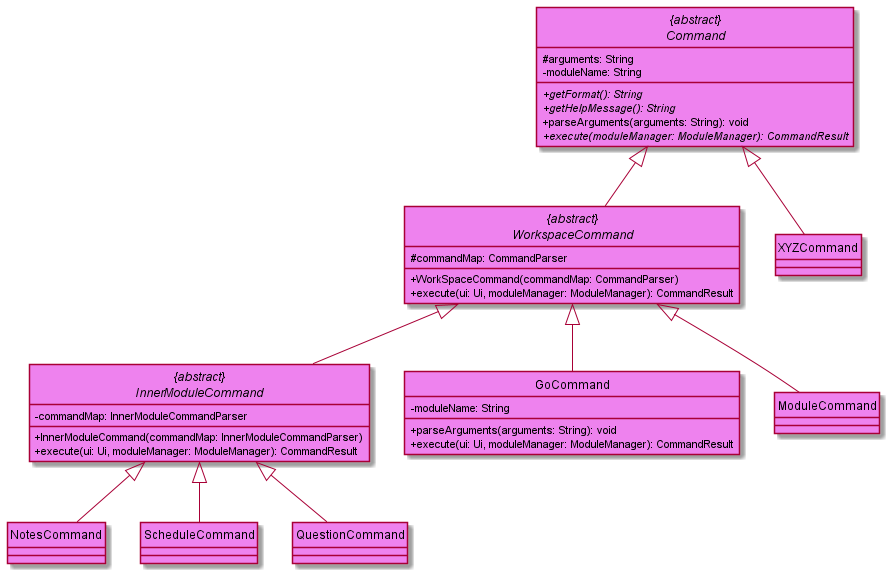
The Command class in fact has an abstract child WorkspaceCommand and grandchild
InnerModuleCommand that inherit from it. In general, aside from the Command classes in the
diagram, all other XYZCommand children simply inherit from Command itself. Each Command child
The WorkspaceCommand class which inherits from Command and requires a CommandParser in its
constructor as this command helps with the workspace implementation. When the command is executed,
it will check if there are any arguments to the command. If there are arguments, it will pass the
remaining arguments the initialised commandMap and attempt to parse and execute the command.
In the case of error, an exception will be thrown and caught in the Terminus class.
In the case where there is no arguments, the program will store the commandMap in the
CommandResult additionalData attribute and returns that CommandResult to the Terminus class.
The Terminus class checks if the CommandResult contains a additionData and replaces its own
CommandParser with the CommandParser stored in additionalData. This command helps Terminus
to change and beware of workspace changes
The InnerModuleCommand class inherits from the WorkspaceCommand.
It functions identical the WorkspaceCommand but has some subtle differences such as requiring a
InnerModuleCommandParser which inherits from a CommandParser but can store another
attribute called moduleName. The InnerModuleCommand execute function will set the initialized
InnerModuleCommandParser’smoduleName attribute using its own stored moduleName attribute.
This InnerModuleCommand purpose to enable any InnerModuleCommandParser to be aware of which
module and pass this module to any of the subsequent commands it may parse.
The GoCommand in particular is a special WorkspaceCommand which has a unique feature that sets
the ModuleWorkspaceCommandParser class workspace attribute to a specific module name and after
validating that the module exists. This command starts the storing of the module name that the
subsequent commands may use identify the module data to retrieve.
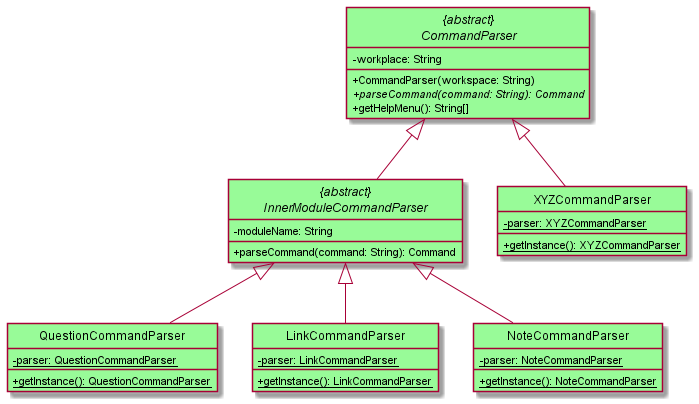
The CommandParser class has an abstract child InnerModuleCommandParser class that inherit from
it. Other than the CommandParser classes mentioned in the diagram above, all other
XYZCommandParser inherit from the CommandParser class directly. Each CommandParser class
contains a HashMap<String, Command> which helps in parsing and return the specific Command
object back.
The InnerModuleCommandParser functions similar to a regular CommandParser but stores and
extra attribute called moduleName. This attribute will be set in all Commands that are parsed
with the parseCommand function. The moduleName allows all it’s Commands to be aware of which
module they need to retrieve the stored data.
The ModuleWorkspaceCommandParser is a special CommandParser that sets the moduleName
attribute for all the subsequent commands, so that they become aware of what module they are
modifying.
To explain the concept, more clearly we will be explaining how the input from the user
go Module note add "Content Name" "Content" will be executed.
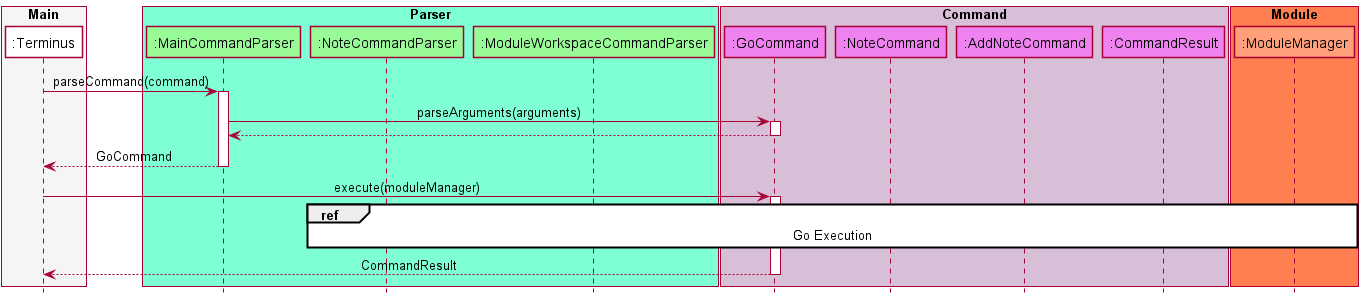
Step 1: After receiving the user input in Terminus, MainCommandParser is called to parse the input
with the parseCommand function which return the specific Command class. In this case GoCommand
is returned. The Command Parsers function by stripping commands down layer by layer. Note the
remaining arguments is Module note add "Content Name" "Content". The GoCommand will execution
will be shown in Go Execution below.
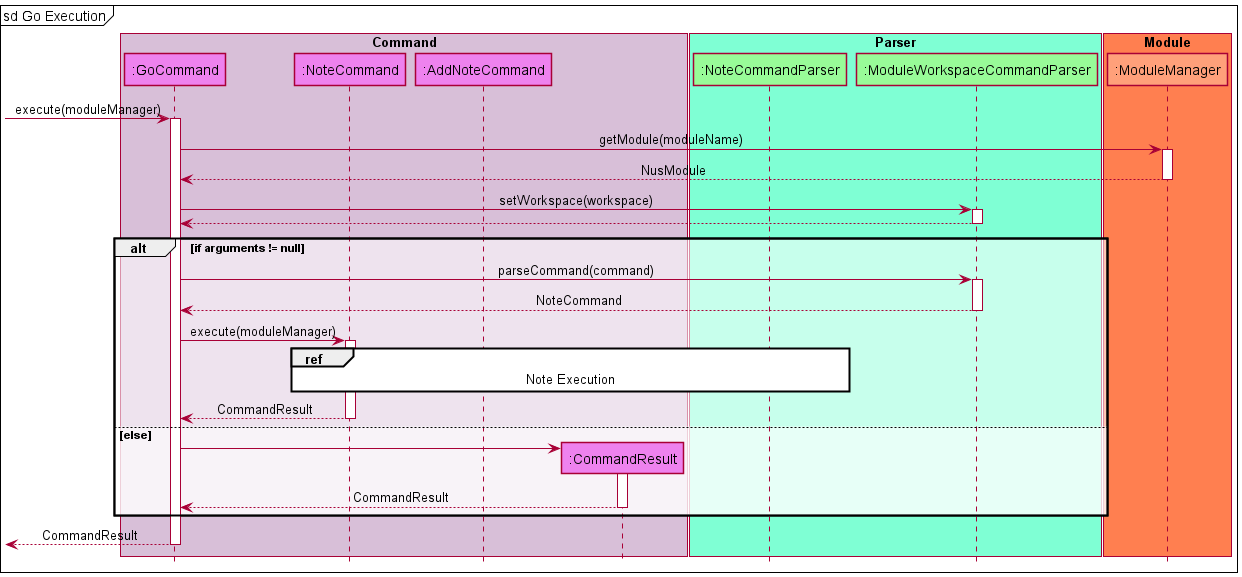
Step 2: The GoCommand executes and validates the module name stored as the moduleName attribute of
the GoCommand and sets the workspace of the stored commandMap with the value of the module name.
This is done so via the setWorkspace function, and for this scenario the workspace for
ModuleWorkspaceCommandParser is set. Note the remaining arguments is
note add "Content Name" "Content" and the module name is Module.
Step 3: Similar to step 1 but with a different CommandParser, the
ModuleWorkspaceCommandParser parses the remaining arguments from GoCommand as a command
and sets the NoteCommand’s moduleName attribute to the value of the module name stored in its
workspace. It then runs the NoteCommand execute function.
Note the remaining arguments is add "Content Name" "Content" and the module name is Module
📝 Note: If the remaining arguments is empty,
ModuleWorkspaceCommandParserwill be stored inside ofCommandResultand returned toTerminus.Terminuswill then replace itscommandParserwithModuleWorkspaceCommandParser, changing the workspace. This would be the same as running the commandgo Modulewithout any further arguments.
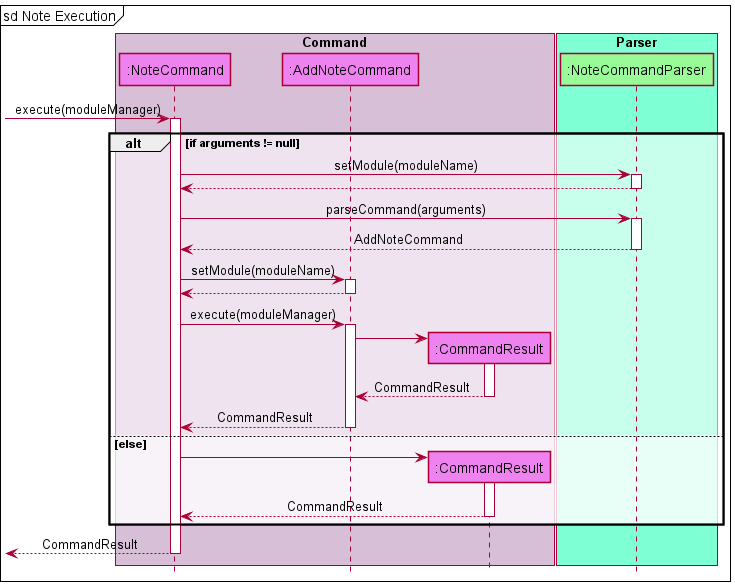
Step 4: Similar to step 1, the NoteCommand setsModule for the NoteCommandParser that is
stored in the commandMap attribute and parses the remaining arguments
add "Content Name" "Content" which results in a AddNoteCommand. The execute function of
AddNoteCommand performs the needed modification to the NusModule for the module with the name
Module(This is not shown to prevent confusion). The execute function then returns
a CommandResult that is propagated to Terminus.
📝 Note: If the remaining arguments is empty,
NoteCommandParserwill be stored inside ofCommandResultand returned toTerminus.Terminuswill then replace itscommandParserwithNoteCommandParser, changing the workspace. This would be the same as running the commandgo Module notewithout any further arguments.
4.3.2 Design considerations
This section shows the design considerations that were taken into account when implementing
the command parsing.
Aspect: Usability for other fellow developers
Since a Command class is required for almost all functionalities in TermiNUS ensuring that the
Custom commands and Command Parsers should be easy for others to implement.
| Approach | Pros | Cons |
|---|---|---|
Single Command Parser with all Commands inherit from a single Command Class, a large switch statement to separate commands. |
Easy to implement and execute function for each class has higher flexibility as they can have different arguments |
When extending to multilevel workspace can be tedious to implement. |
| Multiple Command Parsers each with its own set of commands, require separate managing. | Easy to create new workspace and add command specific the to workspace. | Implementation can be tedious and difficult to upgrade and manage. |
Eventually the team decide to go with the second implementation, as we require multi-level
workspaces and would like to create our own workspace for each feature. Aside from that the
Command provides common functionality that many commands need hence reducing repetition of code.
4.4 Conflict Manager Implementation
The following sequence diagram illustrates how the conflict manager feature works:
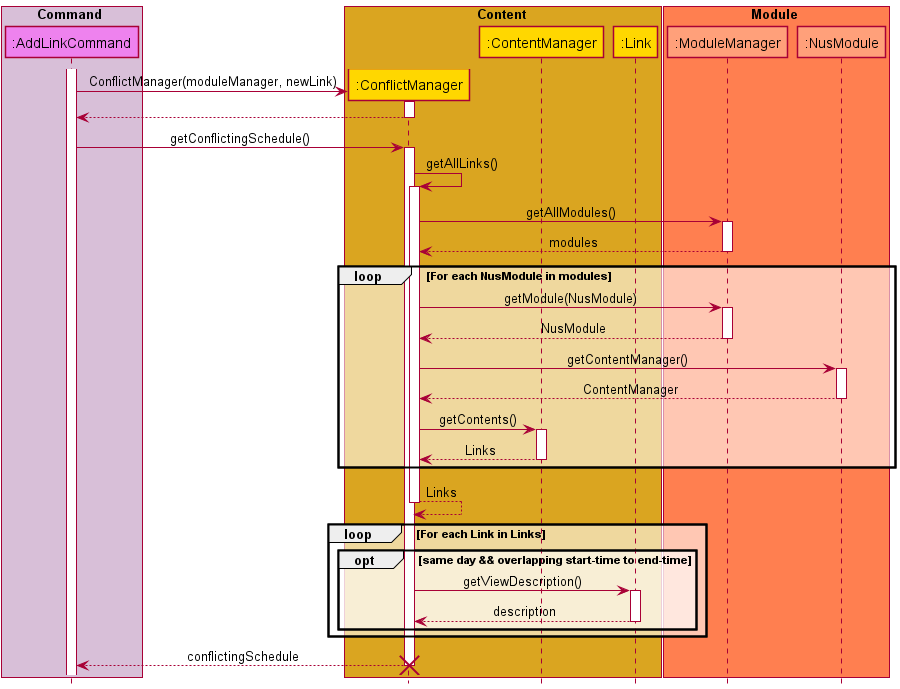
Conflict Manager is a default TermiNUS feature which complements the basic add Link feature.
This feature will automatically list out all the conflicting Link objects with the newly added Link when user executes addLinkCommand
The conflict feature is facilitated by the ConflictManager.
There is no need for users to run a specific command to execute the Conflict Manager as the application will implement the Conflict Manager by default
when users try to add a new Link within their modules.
Given below is an example usage scenario showing how the ConflictManager behaves at each step.
Step 1: When user executes addLinkCommand from workspace.
A new ConflictManager will be generated by the addLinkComand
Step 2: The application invokes ConflictManager#getConflictingSchedule() to get all the conflicting Link with the newly added Link
Step 3: During the current invocation, the ConflictManager will self-invoke getAllLinks to store all the possible conflicting links in an Arraylist.
Step 4: Once ConflictManager#getAllLinks has been invoked, it will first construct a ModuleManager and invokes ModuleManager#getAllModules() to get all the user’s modules.
The application will iterate through all the user’s modules and invoke ModuleManager#getContentManager() for each of the user’s modules.
Step 5: Once the ContentManager has been acquired, the application will invoke ContentManager#getContents() to acquire all the Link objects stored by the user.
All the Link objects will be stored in the ArrayList created in Step 3.
Step 6: The ArrayList of Link objects will be iterated through and filtered.
If the newly added Link object has the same day attribute and overlapping startTime and endTime as the current Link being filtered, then the Link description will be appended to a StringBuilder.
Step 7: The StringBuilder object will be converted to a String object before being returned to ConflictManager and AddLinkCommand.
Then the AddLinkCommand will display all the conflicting schedule during its execution
4.4.2 Design Consideration
This section shows the design considerations that were taken into account when implementing the Conflict Manager feature.
Aspect: Accessibility of Conflict Manager
| Approach | Pros | Cons |
|---|---|---|
| Accessed like other commands | Allows users to view conflicts anytime | Users might not be aware of conflicting schedules upon adding |
| Integrated to Add Schedule | Users will be aware of conflicting schedules upon adding | Slightly challenging for users to identify conflicts at any given time |
Chosen Solution: Integrated to Add Schedule, as we would like to notify users immediately when a conflict occurs. We hope that all users are aware of the conflicts as soon as possible, so that conflicts can be resolved quickly. Although it is slightly challenging to identify conflicts when not adding a new schedule, we think that the timetable feature can help in identifying conflicts manually.
4.5 Storage Implementation
To view the high-level diagram, head to 3.8 Storage.
4.5.1 Initialize Storage Implementation
This section details the technical information of StorageManager when Terminus create the StorageManager.
4.5.1.1 Current Implementation
Step 1: When TermiNUS gets executes, it will need to initialise a StorageManager that handles
any file I/O operations.
Step 2: Terminus will need to provide a path for the main directory where all data are stored
and the main json file where the module,question and schedule are stored.
📝 Note: The main directory is hardcoded within TermiNUS that has the filepath of the directory where TermiNUS was executed from. The main directory will be named data and the main json file will be located within the data folder and it is named as main.json.
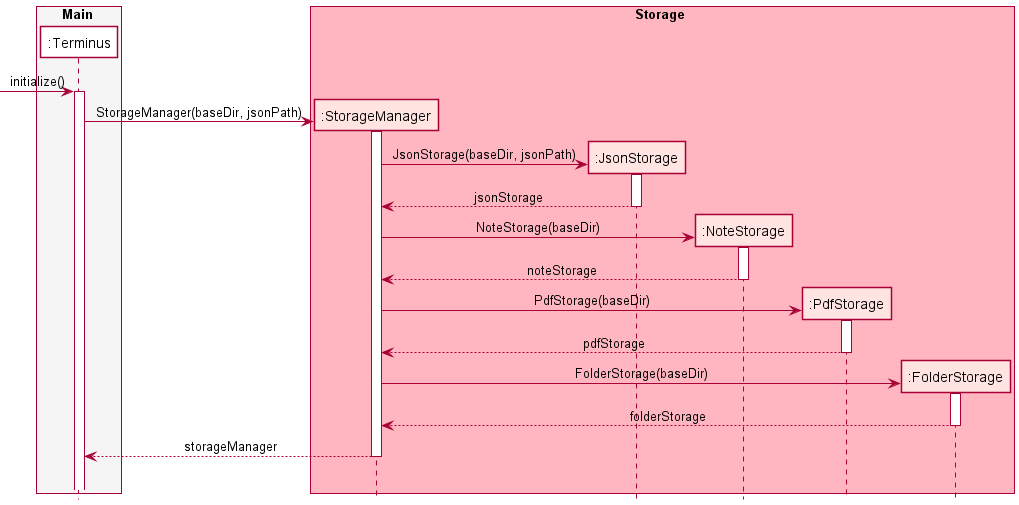
Step 3: When calling the construct of StorageManager, it will create different storage type objects
to handle different storage type file I/O operations. They are NoteStorage, JsonStorage, PdfStorage and
FolderStorage.
| Storage Type | Explanation |
|---|---|
| NoteStorage | Handles any Note related file I/O operations. |
| JsonStorage | Handles any main .json file related I/O operations. |
| FolderStorage | Handles any Module related file I/O operations. As Module in TermiNUS is stored as a folder in the data directory. |
| PdfStorage | Handles any .pdf file related I/O operations. Mainly the export command within the note workspace. |
4.5.1.2 Design Consideration
Aspect: Different types of storage.
| Approach | Pros | Cons |
|---|---|---|
| 2 Types of Storage that handles either file or folder only | More consolidated classes. | Mix handling of third party operations such as gson and pdfWriter with the base file I/O operations. |
| Current implementation of 4 different types of Storage differs by its files operations. | More catered operations that allows the base file I/O to be in another class. | Multiple Storage to be referenced in StorageManager, higher probability of failed initialization. |
Chosen Solution: Current approach with the 4 different types of storage. Allowing all base functionality
of file I/O operations using NIO2 to be in its own class which is in the Storage class. As for the rest
of the storage type class to inherit the functionality of the Storage class while adding their own
checks and third party imports on top of it.
4.5.2 Loading Storage Implementation
This section details the technical information of StorageManager when Terminus loads data in the data directory.
4.5.2.1 Current Implementation
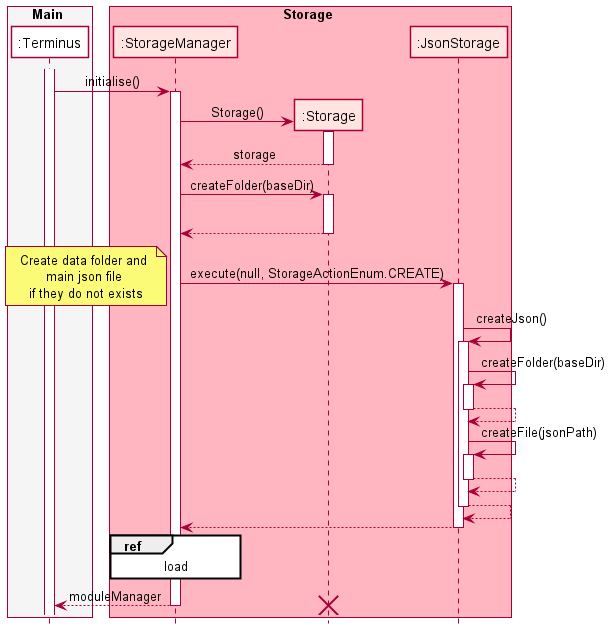
Step 1: TermiNUS will call the method initialise() for StorageManager that will proceed to load
any data from the main data directory.
Step 2: Firstly, StorageManager will attempt to create the main data directory follow by the main.json file
, only if they have not been created yet. This is to ensure that on the first time execution of TermiNUS,
all necessary file and folder are created.
📝 Note: The
createFolder()andcreateFile()uses checks fromFiles.notExists(:Path)before creating the folder and file usingFiles.createDirectories(:Path)andFiles.createFile(:Path)respectively.
Step 3: After, ensuring that all required folder and file are created, it will proceed to load any data
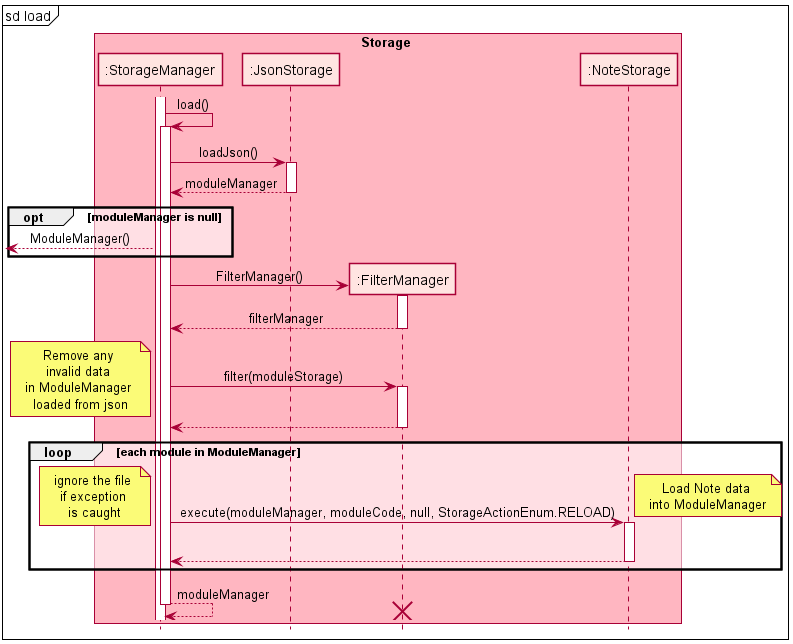
from the main.json file into a ModuleManager object using gson libraries.
Step 4: However, if the main.json file does not contain any data due to the main.json file being
created in step 2, it will create a new ModuleManager object and return it back to TermiNUS.
Step 5: After loading the data into ModuleManager from the main.json file, it will proceed to filter any
invalid data using a FilterManager. The FilterManager will iterate through each data in ModuleManager
and removes the invalid ones.
📝 Note: From this point onwards, the ModuleManager will only contain valid data that matches the criteria set by TermiNUS. One example of the filter done by
FilterManageris module code ofNusModulecannot have spaces.
Step 6: With the validated ModuleManager, it will load any Note data for each NusModule in ModuleManager from its respective module folder.
The nus module mentioned here are the ones currently in the ModuleManager and the folder containing the Note file
has the name of the nus module.
📝 Note: The nus modules in the
main.jsonfile represents theNusModulethat should be in TermiNUS when TermiNUS gets executed. Any other folder within the maindatadirectory with its name not inModuleManagerwill be ignored.
📝 Note: Any
Notefile that causes an error while performing file I/O operations, thatNotefile will be ignored and the program will proceed to load the nextNotefile if any.
Step 7: Once the Note has been loaded into ModuleManager under each of its respective NusModule,
it will return this ModuleManager.
Step 8: And finally, StorageManager will return this ModuleManager back to Terminus.
4.5.2.2 Design Consideration
Aspect: Creates missing folder of existing NusModule.
| Approach | Pros | Cons |
|---|---|---|
Create a folder for the NusModule if its folder does not exists. |
Synchronize folder data with current ModuleManager data. |
Extra file I/O operations needed. |
Do nothing and proceed to check for the next NusModule in ModuleManager |
No need to perform additional file I/O operation to create folders. | Current NusModule in ModuleManager does not reflect in the main data directory. |
Chosen Solution: Do not create the missing folders of existing NusModule in ModuleManager. By performing
the additional filo I/O operation to create a folder may result in an IO Exception due to not being able to
create the specified folder. Due to this, it may abort loading of any notes for any other NusModule in
ModuleManager. Secondly, this method is meant to load existing data and not to create any data that is not
the main data directory or the main.json file.
4.5.3 Execute CommandResult with Storage Implementation
This section details the technical information of StorageManager when Terminus performs required file I/O operations stated in CommandResult after an execution of a Command.
4.5.3.1 Current Implementation
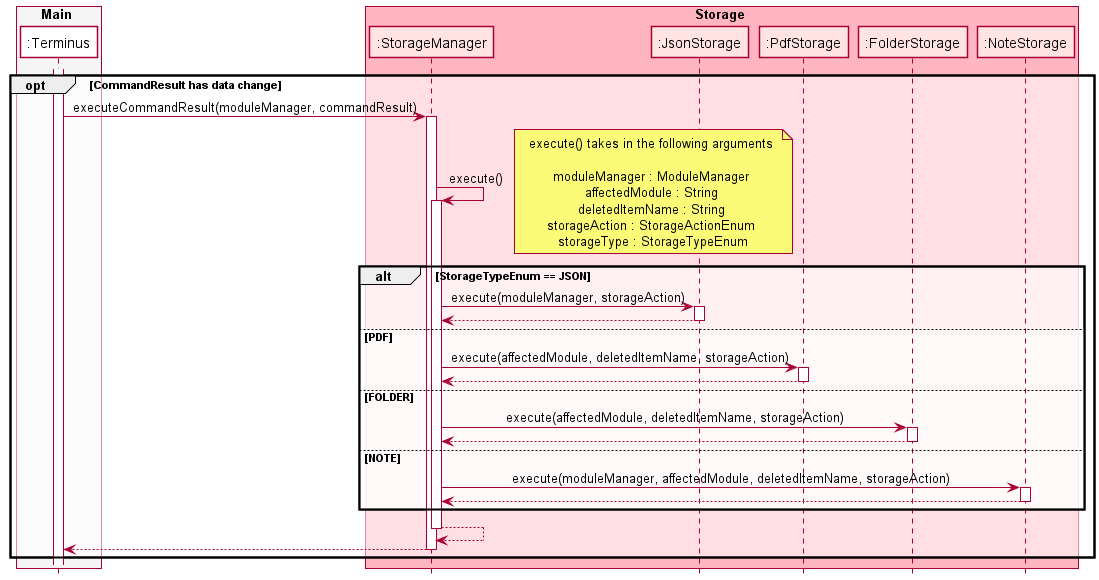
Step 1: When Terminus executes a Command, a CommandResult will be returned. The CommandResult contains
information of the Command execution and this includes any additional file I/O operations needed. If CommandResult.hasChanges() returns
a True, it determines a file I/O operation is needed.
Step 2: If a file I/O operation is needed, Terminus will call the method executeCommandResult() in StorageManager that
handles the extraction of information in CommandResult and parses the information to its respective Storage types for further
processing.
Step 3: Once done, StorageManager will return to Terminus and this concludes the file I/O
requirements from the execution of a Command.
4.5.3.2 Design Consideration
Aspect: Split by StorageAction or StorageType first.
| Approach | Pros | Cons |
|---|---|---|
| StorageAction first. | File I/O grouped by similar changes performed. | Need to handle different types of file. For example, folder and file creation are both different calls in NIO2. |
| StorageType first. | Group by the objects requirements in Terminus. Decoupling of file I/O operations is easier. | In the future, many different file types may result in multiple Storage class needed. |
Chosen Solution: Separate file I/O operation by the type of file involved first which is the solution of StorageType first. This means that each Storage type have a higher decoupling from one another.
4.6 Adding Content Implementation
This section details the technical information of adding a Content into ContentManager.
4.6.1 Current Implementation
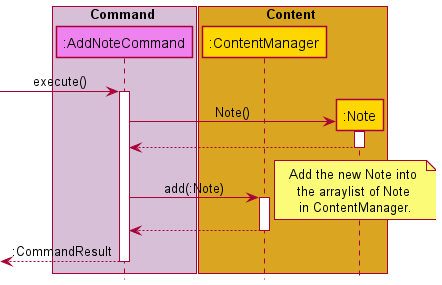
📝 Note: For the other
Contenttype such asQuestionandSchedule, they follow the same logic flow as the diagram shown above. Simply replace theAddNoteCommandandNoteto their respectiveContenttype.
Step 1: When the AddNoteCommand receives the call to execute() from the CommandParser, it will
proceed to add the new Note into its ContentManager.
Step 2: Firstly, it will create a new Note object with the specified arguments for it.
Step 3 Next, AddNoteCommand will pass the newly created Note object into ContentManager for it to
store in its arraylist of Note.
Step 4 Upon, the successful execution of adding the new Note into ContentManager, it will return a CommandResult with
its respective message for user Ui response purposes.
4.6.2 Design Consideration
Aspect: Checks arguments in ContentManager or the AddCommand.
| Approach | Pros | Cons |
|---|---|---|
| Checks argument in AddCommand. | Ease the workload on ContentManager. | Add command can no longer be a generic command used by all Content types. |
| Checks argument in ContentManager. | Command do not need to understand the criteria of a valid Content object. | Introduces a lengthy if-else for each Content type in Terminus. |
Chosen Solution: To validate arguments in the AddCommand instead. This is due to the generic type of
ContentManager that may lead to nested conditions if the arguments are checked within the ContentManager.
4.7 Deleting Content Implementation
This section details the technical information of deleting a Content from ContentManager.
4.7.1 Current Implementation
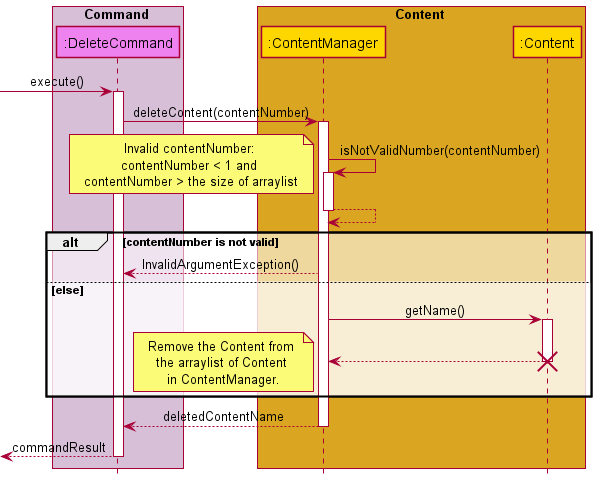
Step 1: When the DeleteCommand receives the call to execute() it will proceed to remove the
specified Content by its content number from the ContentManager.
Step 2: Within ContentManager, it will check if the provided content number is within range
of the arraylist.
Step 3: Once the Content has been removed from the arraylist, it will return the removed Content name
for user Ui response purposes.
4.7.2 Design Consideration
Aspect: To pass the content number as the exact index in the arraylist or the index viewed from the view command.
| Approach | Pros | Cons |
|---|---|---|
| Pass by array index. | Generic use of deleteContent() could be possible for any other Command that requires a removal of a certain Content. |
Could be confusing as the arraylist is not known only to the DeleteCommand. |
| Pass by content number from view. | All indexes used in Terminus will be retrieved from the view command, hence the content number is the only number involved in any Command that requires an index. |
Internal usage to remove an element in the arraylist could not use the deleteContent() unless it adds a 1 to the given index. |
Chosen Solution: To avoid the mixing up of content number and array index, we decided to pass the content number
into ContentManager where it will subtract the given number by 1 to get the index number for the arraylist.
5. Documentation, Logging, Testing and DevOps
This section details how we document, log, test and perform development operations.
5.1 Documentation
Our User Guide and Developer Guide are written in Markdown, and are rendered by GitHub Pages.
All diagrams in this Developer Guide are generated with PlantUML.
5.2 Logging
We wrap the default java.util.logging.Logger in Java in terminus.common.TerminusLogger,
providing us easier access to logging information for debugging and error message displaying. By
default, TermiNUS will not print any logging information to the terminal, and will log anything
equal to or above Level.INFO into the file terminus.log in the same directory the user ran the
application.
5.3 Testing
Testing is done with JUnit testing, and we have added Jacoco as a Gradle plugin to monitor test code coverage.
Before pushing and creating a pull request, please ensure no existing JUnit tests fail, as well as ensure new test cases are written to maintain a high code coverage.
5.4 DevOps
Building and testing can be done with Gradle, and all integration testing is done with GitHub Actions in the GitHub repository.
All pull requests are also checked with Codecov to ensure that overall code coverage does not drop. You may monitor your Codecov progress in your pull request if you successfully passed all the tests.
Appendix A: Product Scope
A.1 Target User Profile
- Students in NUS.
- Wants to enhance their learning experience.
- Has difficulty managing academic materials in NUS.
- Prefers command-line desktop applications.
- Able to type fast.
A.2 Value Proposition
- Helps the target user organise their academic materials.
- Find any conflicts in the schedules from the target user.
- Aids in learning better using Active Recall.
- Consolidate all notes into a PDF for referencing purposes while studying.
- Organise academic materials for different modules.
- Portable and works offline.
Appendix B: User Stories
| Version | As a … | I want to … | So that I … |
|---|---|---|---|
| 1.0 | disorganized student | be able to store my zoom links somewhere | can easily view my links when required. |
| 1.0 | student | be able to retrieve my zoom links easily | can easily find them when required. |
| 1.0 | student | be able to remove zoom links from my regular schedule | can fix any finished lessons. |
| 1.0 | student | be able to add notes taken during lecture | do no need to manage it physically myself. |
| 1.0 | student | be able to delete my notes | can re-organize information taken down by me. |
| 1.0 | student | be able to view the notes taken during lecture | can refer to them easily. |
| 1.0 | student | be able to exit the app properly | can shut down my computer. |
| 1.0 | student | view all available commands in the app | know what commands are there in the application. |
| 1.0 | student | store my data persistently | can use the application properly. |
| 2.0 | organised student | categorize my notes to specific modules | can extract information only from that module I specified. |
| 2.0 | learned student | add questions and answers | can view them later. |
| 2.0 | student | be able to view my lessons for the day | can check my schedule for that day. |
| 2.0 | student | be reminded when my next class is | would not miss any class accidentally. |
| 2.0 | student | be able to extract the notes into a pdf format | can view on my phone outside of the app. |
| 2.0 | student | be able to view my questions and answers | can revise on my module. |
| 2.0 | student | be able to organize my questions and answers into different topics | can find what I want easily. |
| 2.0 | student | be able to delete my questions and answers | can delete the ones that are irrelevant. |
| 2.0 | student | be able to extract information from one computer to the other | am able to sync information between multiple devices. |
| 2.0 | student | be able to create categories for my notes | can organize my notes better. |
| 2.0 | student | ensure that my timetables have no clashes | can have exams are on different timings / days. |
| 2.0 | student | edit a text file instead of within a terminal for lengthy texts | can use my favourite text editor to edit instead. |
| 2.0 | student | view changes edited in the saved text file on the terminal | don’t have to restart the program. |
| 2.0 | student | be able to view my lessons for the week | can check my schedule for that week. |
Appendix C: Non Functional Requirements
- The application should work on any major operating systems (OS) such as Windows,Linux and macOS that have
Java 11installed. - Users with fast typing speed should be able to add and remove content more easily and faster as compared to using mouse.
- The application should be easy to learn and use with the User Guide and/or Developer Guide.
- The application should be responsive to user input.
Appendix D: Instructions for Manual Testing
D.1: Launch and Shutdown
Initial Launch
- Download the jar file and copy it into an empty folder.
- Open a new terminal and navigate to the directory containing
TermiNUS.jar. - Enter the command
java -jar TermiNUS.jarto launch TermiNUS. - The program will display a welcome message and TermiNUS will be ready for use.
Shutdown
- To exit TermiNUS, enter the
exitcommand.
D.2: Workspace Navigation
- When users run a program or enter a new workspace, a welcome instruction indicating the navigable workspaces will be displayed.
- Users can also use the
helpcommand to check the navigable workspace(s). - It is important to take note that workspaces such as
question,note, andschedulecan only be accessed from thegoworkspace -
Test case performed in the
mainworkspace:go cs2113TExpected: Users will be navigated to the
goworkspace, where they can now access thequestion,note, orscheduleworkspaces. -
Test case performed in the
goworkspace:scheduleExpected: Users will be navigated to the
scheduleworkspace, where they can now use theschedulefunctionalities. -
Incorrect commands to try:
a.
go(No module is specified)b.
go X(Where X is not an existing user module)
💡 Advanced users can navigate to sub-workspaces using a single command. E.g.
go cs2113T schedule
D.3: Timetable Feature
- The
timetablefeatures can only be used from the main workspace. -
Test case:
timetableExpected: User’s schedule for the week will be displayed.
-
Test case:
timetable TuesdayExpected: User’s schedule for Tuesday will be displayed.
-
Incorrect commands to try:
a.
timetable today(Today is not a valid day)b.
timetable 1(1 is not a valid day)
D.4: Module Workspace
- Navigate to the
moduleworkspace from the main workspace. - Users can now
add,view,deleteorupdatetheir modules. -
Test case:
add cs2106Expected: Users will have a new module, cs2106.
-
Test case:
viewExpected: All the user’s modules will be displayed.
-
Test case:
delete 1Expected: The user module at index 1 will be deleted.
-
Test case:
update 1 "cs2105"Expected: The user module at index 1 will be updated to cs2105.
-
Incorrect commands to try:
a.
add(No new module is created)b.
delete 0(Invalid index for deletion)c.
update 0 "cs2101"(Invalid module index to be updated)
D.5: Accessing a Specific Module
- From the main workspace, use
goto access a specific module. - A specific module will be accessed when users enter the
goworkspace. - Workspaces such as
question,note, andschedulecan now be accessed. -
Test case:
go cs2105Expected: User will now access the cs2105 module
-
Incorrect commands to try:
a.
go(No module is specified)b.
go X(Where X is not an existing user module)
D.6: Accessing the Question Workspace
- Prerequisite: User has to access a module and operate in the
goworkspace - User can access the question workspace using the
questioncommand -
Test case:
questionExpected: Navigate to the
questionworkspace -
Other incorrect commands to try:
a.
question A(Trailing “A” is not a valid command)b.
question 1(Trailing “1” is not a valid command)c.
questionfrom the main workspace (Question workspace can not be accessed from the main workspace)
D.7: Add Question
- Prerequisite: User has to be in the question workspace
- User can add a new question using the
addcommand -
Test case:
add "What is 1+1 ?" "2"Expected: A new question “What is 1+1 ?” is added to the list of questions.
-
Other incorrect commands to try:
a.
add What is 1+1 ? 2(The use of quotes for questions and answers is mandatory)b.
add "What is 1+1 ?"(An answer must be present for the new question)c.
add(A pair of question and answer must be present for an add command)
D.8: View Questions
- Prerequisite: User has to be in the question workspace
- User can view all the available questions using the
viewcommand -
Test case:
viewExpected: All the questions for the module will be displayed.
-
Test case:
view 1Expected: The question at index 1 for the module will be displayed.
-
Other incorrect commands to try:
a.
view 0(The index 0 is invalid)b.
view X(Where X is a negative number, a word, or a number exceeding the number of questions in the workspace)c.
viewfrom the main workspace (To view questions, executeviewfrom the question workspace)
D.9: Delete Question
- Prerequisite: User has to be in the question workspace
- User can delete selected question(s) using the
deletecommand -
Test case:
delete 1Expected: Delete the question at index 1.
-
Other incorrect commands to try:
a.
delete 0(The index 0 is invalid)b.
delete X(Where X is a negative number, a word, or a number exceeding the number of questions in the workspace)c.
delete(The delete command has to be followed by a valid index)
D.10: Test Feature
- Prerequisite: User has to be in the question workspace
- User can ask themselves questions using the
testfeature -
Test case:
testExpected: Users will be prompted with the available questions.
-
Other incorrect commands to try:
a.
testfrom the main workspace (The test feature can only be accessed from the question workspace)
D.11: Accessing the Note Workspace
- Prerequisite: User has to access a module and operate in the
goworkspace - User can access the note workspace using the
notecommand -
Test case:
noteExpected: Navigate to the
noteworkspace -
Other incorrect commands to try:
a.
note A(Trailing “A” is not a valid command)b.
note 1(Trailing “1” is not a valid command)c.
notefrom the main workspace (Note workspace can not be accessed from the main workspace)
D.12: Add Note
- Prerequisite: User has to be in the note workspace
- User can add a new note using the
addcommand -
Test case:
add "cs2113 tutorial" "SLAP your code"Expected: A new note titled “cs2113 tutorial”, with “SLAP your code” as its content is added to the list of notes.
-
Other incorrect commands to try:
a.
add cs2113 tutorial SLAP your code(The use of quotes for note title and content is mandatory)b.
add "cs2113 tutorial"(Content must be present for the new note)c.
add(A pair of note title and content must be present for an add command)
D.13: View Notes
- Prerequisite: User has to be in the note workspace
- User can view all the available notes using the
viewcommand -
Test case:
viewExpected: All the notes for the module will be displayed.
-
Test case:
view 1Expected: The note at index 1 for the module will be displayed.
-
Other incorrect commands to try:
a.
view 0(The index 0 is invalid)b.
view X(Where X is a negative number, a word, or a number exceeding the number of notes in the workspace)c.
viewfrom the main workspace (To view notes, executeviewfrom the note workspace)
D.14: Delete Note
- Prerequisite: User has to be in the note workspace
- User can delete selected note(s) using the
deletecommand -
Test case:
delete 1Expected: Delete the note at index 1.
-
Other incorrect commands to try:
a.
delete 0(The index 0 is invalid)b.
delete X(Where X is a negative number, a word, or a number exceeding the number of notes in the workspace)c.
delete(The delete command has to be followed by a valid index)
D.15: Export Notes
- Prerequisite: User has to be in the note workspace
- User can export all the notes in a pdf format using the
exportcommand -
Test case:
exportExpected: All the notes will be exported in a pdf format.
-
Other incorrect commands to try:
a.
export X(Where X is any trailing number or word)b.
exportfrom the main workspace (The export command must be executed in the note workspace)
D.16: Accessing the Schedule Workspace
- Prerequisite: User has to access a module and operate in the
goworkspace - User can access the schedule workspace using the
schedulecommand -
Test case:
scheduleExpected: Navigate to the
scheduleworkspace -
Other incorrect commands to try:
a.
schedule A(Trailing “A” is not a valid command)b.
schedule 1(Trailing “1” is not a valid command)c.
schedulefrom the main workspace (Schedule workspace can not be accessed from the main workspace)
D.17: Add Schedule
- Prerequisite: User has to be in the schedule workspace
- User can add a new schedule using the
addcommand -
Test case:
add "CS2113T Lecture" "Friday" "16:00" "2" "https://zoom.us/test"Expected: A new schedule for CS2113T Lecture on Friday from 16.00 for 2 hours with “https://zoom.us/test” link is added to the list of schedules.
-
Other incorrect commands to try:
a.
add "Friday" "16:00" "2" "https://zoom.us/test"(Any missing arguments will result in an invalid command)b.
add CS2113T Lecture Friday 16:00 2 https://zoom.us/test(Any missing quotes will result in an invalid command)c.
add(All arguments must be present for a valid add command)
D.18: View Schedules
- Prerequisite: User has to be in the schedule workspace
- User can view all the schedules using the
viewcommand -
Test case:
viewExpected: All the schedules for the module will be displayed.
-
Test case:
view 1Expected: The schedule at index 1 for the module will be displayed.
-
Other incorrect commands to try:
a.
view 0(The index 0 is invalid)b.
view X(Where X is a negative number, a word, or a number exceeding the number of schedules in the workspace)c.
viewfrom the main workspace (To view schedules, executeviewfrom the schedule workspace)
D.19: Delete Schedule
- Prerequisite: User has to be in the schedule workspace
- User can delete selected schedule(s) using the
deletecommand -
Test case:
delete 1Expected: Delete the schedule at index 1.
-
Other incorrect commands to try:
a.
delete 0(The index 0 is invalid)b.
delete X(Where X is a negative number, a word, or a number exceeding the number of schedules in the workspace)c.
delete(The delete command has to be followed by a valid index)
D.20: Help Feature
- Users can use the
helpcommand to show all the available commands in the workspace. - The
helpmessages might differ in different workspaces. -
Test case:
helpExpected: All available commands and their format in the workspace will be displayed.
-
Other incorrect commands to try:
a.
help X(Where X is any trailing number or word)
D.21: Navigate to Previous Workspace
- Prerequisite: User must have accessed any workspaces other than the main workspace.
- To return to the previous workspace, user can use the
backcommand. -
Test case:
backExpected: Navigate to the previous workspace.
-
Other incorrect commands to try:
a.
back X(Where X is any trailing number or word)b.
backfrom the main workspace (The back command cannot be used in the main workspace)